Tuesday, September 27, 2016

Some Structure Work

I found the perfect kit to occupy the freight siding on the MVRR.

This little freight house kit is from AM Models and was only about $10 on ebay. I really like the design of the dock and the very small footprint it occupies; perfect for the available space. Plus, it's in perfect character for the MVRR's look.


While I generally like to scratchbuild things, I must say that building something in kit form was a very relaxing diversion. It allows me to quickly get down to business with painting, weathering, and detailing, my favorite part.

This is my first time trying out some oil wash techniques for weathering, and I'm very happy with the result. The wash consists of lamp black, burnt sienna, and odorless thinner; it flows very naturally and finds the perfect crevices and corners to collect in.


Tonight, I put the doors and windows on. I'll be adding "glass" soon, and trying out a new technique to simulate dirty windows.


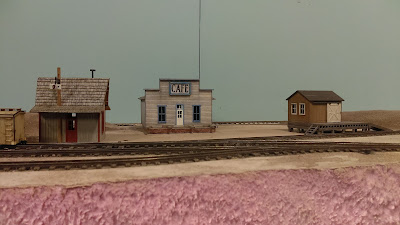
You can see the roof in the background; I'll be applying strips of 1200 grit sandpaper to simulate tarpaper roofing. I'm putting that task off until later.

Here's a trackside view of the town as it stands today. 


And, an aerial view.


Here's my general plan moving forward; definitely some changes and tweaks to the original design. I have two more "scenes" I want to develop in town that I haven't decided on. I've decided to install a low backdrop to hide the rear track. The grade crossing will also be moved to the foreground between the depot and the freight house.


On the other side of the layout, the mountain will grow a bit taller than it was before, with a full-blown tunnel boring through the curve. I scratchbuilt a timber tunnel portal to feature here. 


So that's what's in store. There are a lot of projects to do, and I'm actually enjoying the scattershot approach to tackling each one as the mood suits me. It's nice to get back into the workshop, even for just a couple hours each week.


Tuesday, July 19, 2016

When we last left our heroes...

Wow, it sure has been a while since my last post.

I can't say for certain, but I'm willing to bet that it's been just about the same amount of time since I did any model railroading as well. Between flight training, work, and family, free time has been fairly non-existant. Combine that with the SoCal heat, and I've been unable or unwilling to head into the garage to do "train stuff."

Last night, a rare evening off presented istelf; no outstanding commissions to work on, no studying to do. It was still hot out, so I decided to shelter in the air conditioning and work on a few of my backlogged Marsh Creek Miniatures rolling stock kits.


The Marsh Creek laser-cut kits are an excellent product produced by my friend Rich Brungard. The 20' rolling stock are perfect for micro-layouts and small curves, and have an especially "narrow-gauge" feel to them. They are well-produced and easy to assemble.


As you may or may not be able to tell from the photo, the wood construction of the Gondolas are augmented by 3D-printed parts for the stake pockets. A really great way to produce custom parts for the build.


I have three of these boxcars to build. The finished one, in grey primer, is an example of the quality of the finished result. I find that these are well-detailed, but not to a degree that is overly intricate; you can build one or two in an evening, without having to worry about drilling holes for grab irons, bending wire, et cetera. It's a nice balance between ease of construction and overall detail/effect.

These cars will be a perfect fit for both of my neglected HOn30 layouts. I'm going to order another set of the Gondola kits and build two flatcars as well, to increase my litter to seven cars. 

Thursday, December 31, 2015

Escape from the Doldrums, or, on the Coming New Year

Happy New Year's Eve everyone! I hope the holiday season has been good to everyone.

The holidays have always been a busy time for me as a musician. While many modelers use the winter weather and holiday breaks to retreat to the modeling room, I had only two days off during December, days I utilized to be around family and friends. Suffice to say the modeling workshop has been gathering dust all season.

Of course, this is the time of year when one traditionally takes a good, long look at their personal and professional life, and prepares a giant laundry list of things to change for the better. I'm certainly doing the same, but experience has taught me that focus on a small amount (or single) goal yields better results.

Returning to a theme I found myself considering last year, two words come to mind:

Simplify.

Focus.

OK, so what? In general, it boils down to applying a minimalist mindset to my personal, professional, and recreational endeavors. Here are a few areas where I'd like to streamline things in the modeling world:

1. Scale Focus: HOn30. It's clear my current focus in my home projects lie in this narrow-gauge scale. My N-scale shelf layout has been functioning as a giant storage shelf for almost a year now; the track, components, and rolling stock could be better purposed on my father's N-scale project, and the wall space it takes up could serve as a swappable shelf area to mount my current projects.

My N-scale Junk shelf. It's time to say goodbye...

2. Project Priority. As many modelers do, I tend to accumulate a lot of projects. Some of them get started and lose momentum mid-stream. Others are still in their boxes. That's fine, and it's part of the creative process; but I feel that my time would be best utilized if I cataloged, organized, and prioritized the projects that will contribute to my current overall goals. Projects that I have clearly lost interest in or otherwise abandoned should be sold off, given away, or trashed.

Finding a clearer understanding of the areas of the hobby that give me the most enjoyment will help me focus on projects that are more fulfilling. My recent work on a wooden truss bridge and a small inglenook sidings layout have re-affirmed my love for scratchbuilding.


3. Eliminate Clutter. This is the age-old demon in the garage, and it ties into #2 as well. Clutter is off-putting; it demotivates any urge to go out to the garage and work on something, and makes for a difficult time organizing and finding tools and materials mid-stream. I've done a lot of good work creating spaces, drawers and organizers at the workbench to collect and organize my tools and materials; it's a good idea to develop a habit of creating a clean "blank slate" at the end of each work session to keep my enthusiasm and enjoyment in the space moving forward.

I'm looking forward to finding some time to hit the workbench again soon as the holidays come to a close. Hopefully there will be lots more to share here in the coming months.

On another topic:

I'd like to thank Rich Brungard (of Marsh Creek Miniatures) for a nice mention in his blog recently. You can read the post here. In addition to being an enthusiastic supporter of the modeling community and a fantastic modeler himself, Rich and his home-based company produce some really fantastic HOn30 kits and parts which are rapidly filling the "holes" in this fledgling scales' product line and making it easier for modelers to obtain rolling stock, trucks, and more. Rich has been a great cornerstone of support in the HOn30 community and his work continues to inspire me (and others) to head out to the workbench and "build something awesome," as he puts it. Keep up the great work, Rich!

Tuesday, October 20, 2015

A Diversion - The Inglenook is Born

If you're anything at all like me, you feel a certain sense of guilt when the itch to start a new layout project comes along.

It seems that the unspoken mantra is this: completion is everything. If you haven't wired, scenicked, and operated the bejeesuz out of your current layout before moving on to another project, it's just a sign that you are a failure as a person and incapable of finishing anything.

Let's lose that mindset.

I'm guilty of starting many stalled projects myself; some of which are currently still residing in the garage, in various states of completion. But, at the risk of sounding too "zen," completion is not the goal. It's the journey getting there.

I like to think of it as being akin to any other art form; an artist may be courting his muse on any number of projects at any given time. The whim to work on one, versus the other, varies and changes with mood. So, if you're like me, and starting layouts seems to be your strong suit, then rejoice! It's all part of the creative process, and, hell, you're having fun.

Have I justified myself yet? Because I started a new layout today. I give you...for lack of a better title..."The Inglenook."


The classic Inglenook Sidings switching puzzle has always interested me. It's so simple, and has a lot of "play" factor. An inglenook layout doesn't take extensive car staging, switchlists, or waybills. On a whim, you can just turn it on and go. As I develop more and understand my wants and needs in a layout, I find that the "easy" switch to operations is the way to go for me. As much as I want to love the idea of extended switching ops, car routing, etc., I just don't.  I like to see trains go around in circles, or do simple switching puzzles like this.

I decided to create a very focused list of goals for this layout:

1. Ultra Lightweight (but strong) Benchwork (no metal fasteners, thin luan plywood, minimal foam)

2. *Perfect* operating trackwork. Handlaid. Highly detailed (switch stands). Even power distribution. In gauge, no bumps or kinks.

3. "Indoor Ready" install features; cabinet-grade fascia finish, elegant and clean plug-in interfaces for power and control; finished level of scenery.

4. Easy-peasy DC operation.

5. Option for removable backdrop or lighted valance?

6. Rolling stock must be weighted, micro-trains couplers added, roll freely with no springing or wobble (i.e., PROTOTYPICAL OPERATION!)

7. Design a card-shuffle system to randomize play.

With these goals in mind, I decided to tackle the benchwork. The evening opened up after a cancelled rehearsal.

Everything is thin luan plywood (5mm thick). No fasteners, all glue and clamps.

Glueing and clamping the end blocks.

The Frame 
Stiffeners support the countersunk plywood top

The finished benchwork, with "temp bridge" in place.
I'm pretty amazed how quickly this all came together. It was about 4 hours of work total, from raw 2x4 plywood panels to fnished product.

You'll note my move from foam-based construction to all-wood. While a foam top supported by a plywood frame "tray" would have been a bit lighter, I'm not so happy about the loud sound reverberation from a foam-top table. Plus, foam was the more expensive option. This was a good way to test my theory of using very thin ply to create a relatively lightweight, strong benchwork.

Next up: building a truss bridge and handlaying the track. I have two turnouts already made, and I'll be using Marsh Creek Models' truss bridge plans to build a bridge from basswood. See you soon!


Tuesday, October 13, 2015

Dirt!

In a rare stroke of effort, I went out to the garage and actually did something on the layout today.

Zip texturing applied, waiting for it to dry. I really like the effect of the track weathering and the contrast with the dirt.

Dirt!

While much of the dirt will be covered in static grass and ground foam, I find it satisfying to lay down a base layer of dirt before applying the ballast and the vegetation.

Previously, I tried using unsanded grout on my N scale layout. While the texture and color was great, the reaction with the glue created a strange, glossy finish to the dirt. Also, the grout tended to "float" above the baseboard as a solid layer, meaning it would crack and pull up during passes with a vaccum cleaner. No bueno.

So, I'm trying a technique that is new to me, but not new to the model railroading world: zip texturing.

Zip texturing is a tinting and texturing method using a mix of tempra paints and plaster of paris. The paints serve as the tinting agent, and the plaster of paris binds it together when wet.

Following some online tutorials, I mixed one part each of black, brown, and yellow to twenty-four parts plaster of paris for my tan-colored dirt. There are other "recipes" that will result in different earth tones; I'm thinking that I will mix some different variants to add washes of other colors and textures.

The texture is nice; hoping that it stays affixed that way.

Laying it on couldn't be simpler. Track is masked off. The surface is misted with water, and then the "dirt" is applied thinly using a tea strainer. Then, one more pass with the mister to wet everything down thoroughly.


Any missed spots were wet down again, then more "dirt" was sifted on top and moistened again. The whole job took about 30 minutes. I'm waiting for it to dry now. Keeping my fingers crossed for success!


I left the areas where the buildings will be going blank for now; that way, I can plan out foundations and roads first, then lay dirt in around them.


Keen eyes will note some bright yellow granules; that's yellow tempra that didn't quite mix in well. I will fix it by going back in with some drybrushing, or, cover it with grass. It's a good reminder to mix everything really well the next time around. 

I'll post back here once I determine if the zip texturing was a success!

Monday, August 31, 2015

The Summer Doldrums

Hello, dear readership.

What has come of the Marmion Valley lately?

I find myself in the dreaded summer doldrums, in relation to the railroad. This is common, I think, with most that indulge in our craft; summer brings hot weather, vacation plans, and increased family commitments.

For me, this summer has been intensely busy not only with the family, but also with work. As a professional musician, my schedule ramps up intensely during periods of time where "normal folks" are off on vacations and weekends. I won't lie, I'm a bit burnt out; but it has been a lot of fun too. My band got the chance to tour to Oshkosh, Wisconsin, to take part in an event that happened in conjunction with the giant EAA Airventure airshow.


This event really rekindled my love of aviation, and inspired me to re-start flight training that I began in 2008.

Hey! That's not a train!

The band has also been performing regularly at local venues, and recently toured to Las Vegas to be a part of the Toastmasters' International conference, onstage at Caesar's Palace.

Couple all of this activity with the weeks-long, record setting local heat wave has increased the temperatures in my garage work space to plus-100 degrees, and you can see why I haven't been out working on the railroad lately.

Quite frankly, though, this might be one of the beautiful things about our hobby. Who hasn't been in this situation at one point or another? When the time and mood is right, we can walk right back into our workshop and start in again. Taking a sabbatical like this might also help re-kindle the creative juices, or unearth a new focus or interest.

I find that my involvement in the hobby as it stands at this moment has been reading and digesting information from fellow bloggers and like-minded individuals in online communities like Facebook. There is a great Facebook group that is focused on HOn30 and 009 modeling, where many of the discussions help lead ideas about how to promote this niche scale that we work in. 

I'm also attracted to the crafstman-like approaches of modeler/bloggers like Mike Cougill, Lance Mindheim, Trevor MarshallChris Mears, and Dave Frary (to name a few). These writers and modelers elevate the idea and concept of our hobby into a "craft," as Cougill puts it; viewing it through the lens of an art form in terms of composition and application, and using it as a vehicle for personal growth and progress, especially in the sense of holding yourself to a high standard of quality and attention to detail. 

I know the coming fall and winter months will bring some time to get back to work and enjoy some time with the trains once again; I'm excited to share things with you all here as things get rolling once more. Stay tuned!


Thursday, July 23, 2015

Handlaid HOn30 Turnout, Mark II

I decided to start on another handlaid HOn30 turnout. My first concepts for the hinged point system were successful, and I was confident I could improve upon my last try.

I've been researching soldering techniques, and recently upgraded my soldering iron setup. I've mentioned this before, but I used to hate soldering. With a passion. I have a legacy of awkward, sloppy, botched solder joints to attest for that.

However, as I've delved into DCC and handlaid track, soldering has become a necessity, so I've invested time reading and researching the topic extensively. As a result of that research (and a lot of practice), I find I'm starting to enjoy soldering much more lately as I apply the concepts I learn to make cleaner, tidier work.


It's the details that become important in the soldering process; an appropriately shaped fine-tip, for one. Being fastidious about cleaning and tinning the tip after every solder joint. Oh, and the granddaddy of all soldering rules: USE FLUX!

Compare the joints on the straight stock rail (first install) to those of the diverging route (second); even in this build, the joints got better as I worked through the turnout.

The blobby solder joint near the top really stands out. However, I'm fairly happy how clean the web of the rail is; no gobs of solder seeping between the foot and head of the rail.
I'm finding a new determination to make each piece of work better than the last. This applies to not only this turnout, but each kit, paint job, coupler installation, scenic treatment, etc. Finding improvements to my skill set, and seeing the results improve with each try is really becoming a rewarding part of this hobby for me.